Showing posts with label sprites. Show all posts

Monday, April 14, 2008

Cross Browser Rounded Borders Using Sprites

I was reviewing techniques for rounded borders and came across this. It uses four background images for each of the corners; however, they're not using a sprite. So, we'll do it with a single sprite. Once we're done, we'll have something like this that works on all the major browsers ( IE6/IE7, Firefox, Safari and Opera ) --


First, we'll take the four corner GIF images that they have, make them transparent ( using a bitmap editor ) and then use a sprite generator to create our sprite as well as the supporting CSS. I like to use the one from Website Performance.

Next, we'll take the layered approach which means that we'll nest absolutely positioned elements in a relatively positioned container. So, the four corners, the two horizontal and vertical lines are absolutely positioned.

Here's the structure --
    <div class="b2">
<div class="border-container">
<div class="sprite-tl2"></div><div class="sprite-tr2"></div>
<div class="horz-line top-line1"></div>
<div class="horz-line top-line2"></div>
</div>
<div class="content">
We're using sprites for rounded borders. This implementation works in IE6/IE7, Firefox 2.0.x, Safari 3.1 and Opera 9.27. <a href="http://skypoetsworld.blogspot.com/">Read more.</a>
</div>
<div class="border-container">
<div class="sprite-bl2"></div><div class="sprite-br2"></div>
<div class="horz-line bottom-line1"></div>
<div class="horz-line bottom-line2"></div>
</div>
<div class="vert-line left-line1"></div>
<div class="vert-line left-line2"></div>
<div class="vert-line right-line1"></div>
<div class="vert-line right-line2"></div>
</div>

and here's the CSS --
      .b2{width:20em;margin-bottom:5px;position:relative;}
.border-container{position:relative;}
.sprite-bl2{background: url(roundsSprite3.gif) 0 -30px no-repeat; position:absolute;width:11px;height:10px;top:0;left:0;}
.sprite-br2{background: url(roundsSprite3.gif) 0 -70px no-repeat; position:absolute;width:11px;height:10px;top:0;right:0;}
.sprite-tl2{background: url(roundsSprite3.gif) 0 -110px no-repeat; position:absolute;width:11px;height:10px;top:0;left:0;}
.sprite-tr2{background: url(roundsSprite3.gif) 0 -150px no-repeat; position:absolute;width:11px;height:10px;top:0;right:0;}
.content{padding:10px 10px;font-family:verdana;font-size:93%;}
.horz-line{position:absolute;border-top:1px solid #EC9E3C;width:50%;}
.top-line1{left:11px;top:0;}
.top-line2{right:11px;top:0;}
.bottom-line1{left:9px;top:9px;}
.bottom-line2{right:10px;top:9px;}
.vert-line{position:absolute;border-left:1px solid #EC9E3C;height:50%;_height:2em;}
.left-line1{top:10px;}
.left-line2{bottom:0;}
.right-line1{top:10px;right:0;}
.right-line2{bottom:0;right:0;}

It's all pretty self-explanatory. You can view the sample and the source here. Feel free to use and improve it!
Have fun!

Friday, March 21, 2008

Using Sprites :: Transparent PNGs in IE6


IE6 doesn't support transparent PNGs unless you use Microsoft's
alpha filters. You can't use alpha filters for background images which is a key part of using sprites.

Fortunately, you can "sort of" simulate it. Julien Lecomte has this good write-up.

The key is to use the CSS clip property and to replace background with that. Here's my implementation --
.sprite-s0 {
width:47px;
height:62px;
_width:62px; /* Width of the sprite */
_height:672px; /* Height of the sprite */
background:url(spaceShipSprite.png) no-repeat 0 -30px;
filter:progid:DXImageTransform.Microsoft.AlphaImageLoader(src="spaceShipSprite.png", sizingMethod="scale");
_background:none; /* Clears the background */
_margin-top:-30px; /* We have to adjust for the position of the space ship */
_clip:rect(30px 47px 92px 0);
top:0;
left:0;
}

Here's the example.

The above selector rule applies different CSS properties depending on your browser. Of course, the underscore before the property only applies to IE6. Keep in mind that there's limitations to this approach.

First, clip isn't equivalent to background because unlike background, you're actually specifying the size of the sprite. When you use clip, you're showing the area that's not clipped. If you're not using animation, it looks identical to a background image. However, if you intend on animating the sprite, clip isn't effective because you're not moving the 47x62 sprite, but moving the entire 62x672 graphic.

Second, and this a big limitation, clip only works for absolutely positioned elements.

Knowing all of this, we probably won't be using this technique to animate our spaceship and its flying targets.

Sunday, April 29, 2007

Sprites :: Reduce the Number of HTTP Requests

Recently, Matthew Batchelder wrote a piece entitled "Faster Page Loads with Image Concatenation." It's similar to the "Sprite" pattern described by Michael Mahemoff.

The idea is that you load small icon-blocks and from those blocks, use the icons as images in your application. This allows you to load the images once rather than making separate requests for each image.

As front end web developers, we know that reducing the number of HTTP requests is very important. As Yahoo!'s first Performance Research noted, "Reducing the number of HTTP requests has the biggest impact on reducing response time and is often the easiest performance improvement to make."

Matthew's technique uses background images and a little CSS to display icons.


We can easily apply the same technique in Bindows especially for components like toolbars, menus and buttons.

First, we'll choose an icon-block. Matthew used this one and so will we

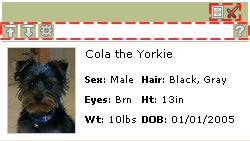
We'll use the icon-block to build a custom non-modal window that contains a photo and descriptive text. Other than providing a visual cue for mouseover, mouseout and click, the icons aren't "hooked up" and so don't do anything more.


Though you see seven images, there
are only two that are loaded. The icons are treated as background images each in a BiToolBarButton which of course are found in a BiToolBar.

The highlighted dashed lines indicate the two toolbars


We build the toolbar as we normally do, but this time instead of specifying a separate image for each icon, we'll use a transparent GIF. Then, we'll specify the background image by positioning the icon-block in the correct location.

Here's how we do it "inline" using the setStyleProperty(property, value) method found in BiComponents --


Of course, you can and should pull all the inlining out and then put them in a theme --


where the class names and selector rules associate with appearances. Here are the ones for the expand and close tab menu buttons --


Repeat this process for each icon and you're done! Note that we've only shown how this applies to toolbars, but you can apply it to almost anything.

Keep in mind that it's best to have predictable images ( i.e. the icons should be same size, etc. ). It makes it easier to apply this technique.

You can get all the associated code including the theme here. To see the example go here.

Have fun!