Friday, December 14, 2007

Anonymous Function Fun

Yahoo!'s Julien Lecomte wrote an interesting piece regarding the perils of using innerHTML.

One of the "bad things" that can happen are memory leaks caused by circular references. He provides this inner function which breaks the reference --
     (function (o) {

var a = o.attributes, i, l, n, c;
if (a) {
l
= a.length;
for (i = 0; i < l; i += 1) {
n
= a[i].name;
if (typeof o[n] === 'function') {
o
[n] = null;
}
}
}

a
= o.childNodes;

if (a) {
l
= a.length;
for (i = 0; i < l; i += 1) {
c
= o.childNodes[i];

// Purge child nodes.
arguments
.callee(c);

// Removes all listeners attached to the element via YUI's addListener.
YAHOO
.util.Event.purgeElement(c);
}
}

})(el
);

If you're new to JavaScript and if the syntax isn't familiar, it's
worth a closer look.

First, the function has no name. It's an anonymous function
that accepts one argument, the object 'o'.

Because it's an anonymous function and since there's no
reference to the function whatsoever, you can't use "this" to
refer to the function, but you can always do this --

arguments.callee(c);

All functions implicitly have the property "arguments" which
behaves somewhat like an array but isn't ( you can iterate
arguments like an array and get its length, but that's where the
similarities end). More about the arguments property is found
here.

Arguments themselves have properties and one of those is
"callee."

Think of the callee as the currently executing function which
substitutes for the "this" object.

Notice that once the function is defined, it's immediately
executed. We see this at the very end --

(function (o) {
...
})(el);

If all of this is still puzzling, we can rewrite Julien's function to
look like --

var breakCircularReference = function (o) {

var a = o.attributes, i, l, n, c;
if (a) {
l
= a.length;
for (i = 0; i < l; i += 1) {
n
= a[i].name;
if (typeof o[n] === 'function') {
o
[n] = null;
}
}
}

a
= o.childNodes;

if (a) {
l
= a.length;
for (i = 0; i < l; i += 1) {
c
= o.childNodes[i];

// Purge child nodes.
this
(c);

// Removes all listeners attached to the element via YUI's addListener.
YAHOO
.util.Event.purgeElement(c);
}
}
}

breakCircularReference(el);


We've given the once anonymous function a name -
breakCircularReference.
This allows us to reference it which means that "this"
refers to the function breakCircularReference. We no longer
have to use arguments.callee.

The name also allows us to call it --

breakCircularReference(el);

which I think is easier to read and understand for new
JavaScripters.

Have fun and happy holidays!

Monday, December 03, 2007

Bindows Gauges

Recently, Bindows released a set of very functional gauges. These are "provided free of charge." They're built on top of their excellent Bindows component library.

The gauges are built from their BiGauge2 component.

One of the great things about these gauges is that it not only gives you a flavor of what Bindows can do, but that at least with these gauges, you don't need Bindows to manipulate them.

All you really need is the ability to set the value of the needle and the labels.

Here's an example. ( Make sure that you're running this in IE5.5+ or Firefox 2. The gauges won't show up in Safari ).

The two gauges respond to the mousemove event. The x or the e.clientX position and the y or the e.clientY position are updated on the gauges.

First, you'll need to get the gauges. Bindows has made this really easy. You need to download the gauge library and then follow these instructions.

Once you have them, you can manipulate the XML that defines the gauges. You can change the label, the start point, the end point, the ticks, etc.

However, those changes are static. What's more useful is to make changes at runtime. So, now, it's a matter of adding an event handler to manipulate the gauges.

In our example, we do two things --

1) Update the value of the needle with the new x/y position
2) Update the labels with the actual x/y position

The first is easy and is documented by Bindows. In our case, we do --

var xPosGauge = bindows.loadGaugeIntoDiv("gauges/gauge1.xml", "xPosGauge");
var yPosGauge = bindows.loadGaugeIntoDiv("gauges/gauge2.xml", "yPosGauge");

var xNeedle = xPosGauge.needle, yNeedle = yPosGauge.needle;

var handleMousemove = function(e) {
var x = parseInt(e.clientX);
...
xNeedle.setValue(x);
var y = parseInt(e.clientY);
...
yNeedle.setValue(y);
}

We get a reference to the gauge object, get the property "needle" and then at runtime ( in the mousemove event handler ) set it's value. The needle moves!

The second part is a little bit more difficult. I wasn't able to find a way to get to the labels without doing a "hack."

Through the magic of Firebug ( or Microsoft's Developer Toolbar ), we'll find out that the label is a BiGauge2Label.

Unfortunately, knowing that isn't really too useful. What's more useful is knowing where the second label appears in the structure of the gauge. By knowing that, we get a reference and can manipulate it.

This is why there's this strange looking code which locates the second label --

var xKids = xPosGauge.__gauge._gauge2Group.getChildren();
var len = xKids.length;
var ct = 0, xPxLabel, yPxLabel;

for (var i=0;i
if (xKids[i] instanceof BiGauge2Label) {
if(ct==1) {
xPxLabel=xKids[i];
break;
}
++ct;
}
}


Once we get the label, it's just a matter of setting it in the event handler --

var handleMousemove = function(e) {
var x = parseInt(e.clientX);
xNeedle.setValue(x);
xPxLabel.setText(x);
var y = parseInt(e.clientY);
yNeedle.setValue(y);
yPxLabel.setText(y);
}

The example uses the YUI Library to add the mousemove event, but you don't have to. You can use any library you want ( or not ) to handle the event.

To run my example, on your systems, you'll need --

1) The Bindows gauge library
2) My two gauges ( gauge1.xml and gauge2.xml )
3) My code ( and view the source )

That's it! Please update and improve. Enjoy!

Monday, November 26, 2007

JavaScript String :: Primitive or Object?

A colleague and I were chatting about JavaScript strings and he noted that they're not objects. He's half right.

JavaScript strings are primitives much like numbers and booleans, but they can also be objects ( like Numbers and Booleans ).

You can create a String object ( I've capitalized String ) by calling it's constructor --

var aStr = new String("I'm a String object");

You can also create a string like this without calling the constructor ( that is without the "new" operator ) --

var aStr = String("I'm a string primitive");

This is the same as calling --

var aStr = "I'm a string primitive";

which results in a string primitive or as I typically call it, a string constant or a string literal.

Typically, you don't have to worry about whether you're dealing with a string primitive or a String object because JavaScript automatically converts the primitive to a String object.

So, you can do things like getting the length of a string primitive --

var myStr = "I'm a string primitive";
alert(myStr.length);

or calling methods --

alert("string primitive".substring(0,7));

All this means is that you can access any property found in the String object from a primitive.

The difference between a primitive and a String object is when you're adding functionality to a String. You can't do it to primitives.

So, if you wanted to add a function to reverse the characters in a string, you'd do something like this by adding it to the String object's prototype property --

String.prototype.reverseString = function() {
var len = this.length;
var result = "";
var strArray = [];
var ct = 0;
for (var i=len-1;i>=0;i--) {
strArray[ct++] = this.charAt(i);
}
return strArray.join("");
}

If you called it,

"cola".reverseString();

it's the same as

var cola = new String("cola");
cola.reverseString();

Though you've added the method to the String object, you can use it with a primitive!

Note that JavaScript strings are immutable ( you can't change them ). This is why the method reverseString returns a new string from the array.

All of this is pretty obvious, but I thought I'd share my thoughts.
Enjoy!

Sunday, November 18, 2007

iGoogle and Newsvine Dashboards

I've always been partial to dashboards and often write about it. I've done a number of prototypes just to experiment with visualizations.

Dashboards allow you to organize and see the information you want without adding too much clutter.

Here's my implementation. It works in IE, Firefox, Safari and Opera.

I particular like the visualizations found in the iGoogle and Newsvine dashboards. They provide nice feedback on the container that you're moving and where you'll drop it. So, I've copied that.

When you move a container, everything is **real** size -- not a sliver for where you'll drop the container. For me, the argument that you cause too drastic of a visual change to the layout doesn't hold water.

You're only moving one container at a time and it's not a common operation. You basically move a container, get it into the fold and view it.

You're also only dealing with a **few** containers. This is a dashboard.

The key to the implementation is controlling the container's drag over behavior. Each container needs to react to the container that's being dragged over it. So, pick a library that the supports such behavior ( you can pick Bindows, but keep in mind that if you do, you won't be able to see the dashboard if you turn JavaScript off; of course, with any library, turning it off means that there's no behavior at all! ).

My implementation uses YUI 2.3 which easily handles drag over with the drag and drop library.

In this case, a drag over, inserts a temporary marker above the container.

When you drag out, the marker is removed and the container list collapses ( each container is statically positioned ).

All of the JavaScript is really short and pretty much self explanatory. Run the example and view the source. Use and improve it.

Have fun!

Sunday, November 11, 2007

Select and Scroll

A colleague asked how I would implement this --
  1. Click on an item in an list
  2. Vertical scroll to it
I can up with this --


I think the only way that this can be done is if the item ( in this case a div ) is absolutely positioned. For each item, you can get the value for CSS style "top" from the item's parent ( container ).

If the item uses default positioning ( i.e. static ), "top" is auto which is pretty much useless for moving the vertical scroll bar. If position is relative that's also not useful because "top" is relative to the previous element.

The idea is that we'll increment the parent's "scrollTop" property until that's equal to the top position of the item. This causes vertical animated scrolling ( if you don't want animation, you could just set "scrollTop" to "top"; however, keep in mind that this "jumps" rather than transitions to the item ).

We end up with a some simple JavaScript --

var doScroll = function(e){
var target = YAHOO.util.Event.getTarget(e);
var container = document.getElementById("container");
var targetTop = parseInt(YAHOO.util.Dom.getStyle(target, "top"));

var animateScroll = function() {
var maxScrollTop;
if (container.scrollTop !=
maxScrollTop = container.scrollTop; container.scrollTop+=2;
container.scrollTop == maxScrollTop ? clearInterval(intervalID) : "";
} else {
clearInterval(intervalID);
}
var info = "container.scrollTop = " + container.scrollTop;
document.getElementById("info").innerHTML = info;
}
var intervalID = setInterval(animateScroll, 1);
}
YAHOO.util.Event.on("container", "click", doScroll);

Note that we're using YUI, but that's not critical. YUI is used to handle events in a cross-browser manner as well as getting the CSS style ( you can do this with target.style.top, but I chose to use YAHOO.util.Dom.getStyle() ).

maxScrollTop tells us whether the scroll button is at it's maximum value. We know this when we increment the container's scrollTop and it doesn't change. When that happens, we stop the animation by clearing the timer.

You can see the full example
here.

If you can do this with static or relative positioning, I'd love to see your solution!

Have fun!

Saturday, October 06, 2007

Stixy Dialog

I think one of the best things to do is to imitate UI controls. It's a great way to test your front-end skills and the toolkits that you're using. It's also incredibly fun.

Continuing along our previous DnD and resizing examples built in part with YUI, here's an imitation of a dialog found in Stixy, a web-based free-form collaborative and file sharing application --


There's nothing really special here ( other than how nicely the green color matches with the pink ). The DnD and resizing are basic "things" that you can build from YUI ( we're using YUI 2.3 ).

In the dialog, you can type in text. Note that both the date and time update asynchronously.

Go ahead and review the code. You'll see the full example here.

Have fun!

Wednesday, October 03, 2007

Resizing with YUI

Here's a really simple example of using YUI's Drag and Drop component to build a resizer. It's not a reusable component, but you'll see just how little JavaScript you need to do something like this.

Here's the example --


The JavaScript looks like --


I'm using YUI 2.3, but the version really shouldn't matter.

The HTML is even simpler --


and then we style it with some CSS --


That's all there is to it. This illustrates how you can use YUI's "helper" components to enhance your application.

Use and enhance this example as much as you like.
Have fun!

Wednesday, September 19, 2007

SplitPane Control :: YUI

One of the basic controls is the split pane control. YUI doesn't have one right out of the box. So, we'll build one.

Note that Jack Slocum created one based on YUI about a year ago for his ExtJS library. He called his a "SplitBar Component."

Of course, Bindows has a **pure** JavaScript one.

We'll base ours off of the YAHOO.widget.Slider. We'll take advantage of its ability to slide horizontally and vertically. This also means that whatever YUI pieces that the YAHOO.widget.Slider uses, we'll use those as well.

Here it is in action --


Like the YAHOO.widget.Slider, we'll retrieve a horizontal and vertical split pane by doing it the static way --

var horzSplitPane = MySplitPane.getHorizSplitPane("SliderBg", "Thumb", 145, 200, "LeftContainer", "RightContainer");

var vertSplitPane = MySplitPane.getVertSplitPane("SliderBg", "Thumb", 194, 250, "TopContainer", "BottomContainer");


So, we'll mimic the YAHOO.widget.Slider API --

var horzSlider = YAHOO.widget.Slider.getHorizSlider(sBGElId, sHandleEId, iLeft, iRight);

var verSlider = YAHOO.widget.Slider.getVertSlider(sBGElId, sHandleEId, iUp, iDown);


With the exception of the additional two panels, we'll keep the arguments the same. Leveraging what YUI users already know allows them to easily learn your API.

We'll use these two methods to get the split panes --

MySplitPane.getHorizSplitPane(sBGElId, sHandleEId, iLeft, iRight, leftContainer, rightContainer)

MySplitPane.getVertSplitPane(sBGElId, sHandleEId, iUp, iDown, topContainer, bottomContainer)

where
  • sBGElId is the ID of the slider background
  • sHandleEId is the ID of the slider thumb
  • iLeft/iUp is the number of pixels the slider can move left or up
  • iRight/iDown is the number of pixels the slider can move right or down
  • leftContainer/topContainer is the ID of the left or top pane
  • rightContainer/bottomContainer is the ID of the right or bottom pane
The actual augmentation isn't based on prototype inheritance. MySplitPane is really a wrapper around the getHorzSlider and getVertSlider methods --


Each method, getHorzSplitPane and getVertSplitPane, is treated as an object in an object literal which is returned within the Singleton method/object MySplitPane. The end result are two public methods.

We subscribe to the "change" event which through the handler, handleChange, resizes the panels.

You of course can add more functionality by subscribing to your own "change" event and then using the handler to do something else like update the text in the panels --


Two of the more interesting utility methods are YAHOO.util.Dom.setStyle and YAHOO.util.Dom.getStyle. They're used instead of node.style so that you can get "style" name/value pairs even if they're not defined inline or via JavaScript.

The YUI documentation notes that getStyle "normalizes currentStyle and ComputedStyle."

That's it!

You can view MySplitPane here. Visual examples for everything above are found here and here.

Feel free to use or modify the code.

Have lotsa fun!

Saturday, September 15, 2007

YUI :: First Impressions

People must think I've been living in a cave, but I've only recently been playing with YUI. In the past two years, I've been a Bindows developer creating a few examples here and there and so, I know that framework pretty well.

Of course, now that I'm at Yahoo!, I'm supposed to get a firm grasp on the library. Unlike other web devs at Yahoo!, I haven't taken any classes on YUI. So, this series of entries will be a "fresh eyes" approach to YUI.

It's not a difficult library to learn and it's definitely not as comprehensive with it's controls/widgets as Bindows.

As you probably know, I think Bindows is great. IMHO, it's one of the best ( if not the best ) traditional front-end frameworks out there. You can do a lot with it ( just check my archives for examples or visit my site ).

In contrast, YUI isn't a framework. It's **mainly** an a la carte library of JavaScript utilities and widgets that help with web development. It abstracts browser differences so that you don't have to worry about it.

YUI also contains other things like CSS files that help with layout, font sizes and other troubling difficult to solve cross-browser issues.

What's interesting about YUI is that it's a mixture of things --
  • Utilities that help with DOM manipulation and event handling
  • CSS for cross-browser visual consistency
  • A few "hard to do by yourself" controls/widgets
One of the fundamental assumptions of YUI is that you need to know the DOM and how to manipulate it. You also need to know event handling. You'll need to know the structure of your application and how to style it. So, you need to know the "Big 3" - HTML, CSS and JavaScript.

YUI doesn't attempt to abstract these things ( which is a lot different than Bindows and a few other libraries which abstracts everything and all you really need to learn is JavaScript and the API. Of course, these libraries are typically "fatter" than a la carte libraries, but also have ways to remove libraries if they're not used ).

One advantage to the YUI approach is that it's a lot easier to add functionality to pre-existing systems. This is because you directly manipulate DOM elements. So, you basically load the library and then pass nodes, ids, etc. to helper methods which performs the magic.

Because YUI is an a la carte system, you'll only pick and choose what you want. It's easy for you to control the "size" of your library.

Like Ajax technologies, you can gradually introduce it into your system. For example, if you're interested in cross-browser event handling, you'd just pull in event.js which includes the YAHOO.util.Event class. You can throw one away home grown solutions like my own.

For now, we're just going to look at two of the utility components. In the future, we'll look at the core components and some of the handful of YUI controls/widgets.

About the Example
I'm really fond of DnD. People are still amazed that you can drag and drop in the browser. So, our first example will use the dragdrop library with a little sprinkle of animation.

Here's the example -- we'll drag a little box around and as we drag it, we'll provide visual indicators of the location of the box. Once we stop, we can undo our current position ( see it full screen here ) --


Both of these libraries manipulate the DOM, so you have to have markup.

So, the very first thing we do is take care of all the visual pieces. For us, it's the little draggable box, the "Undo Button" ( which is initially is not shown ), the left and the top positional markers which result in this simple structure --


The CSS is just as simple --


To use the dragdrop and animation libraries, you'll need to pull in three JavaScript files --


Note that yahoo-dom-event.js is used by both libraries.

Next, the fun begins! The general sequence for DnD is -
-
  • Get the element you want to drag
  • Instantiate a YAHOO.util.DD object with that element
  • Override the drag event handlers ( typically onDrag, but in our case we also overrode startDrag and endDrag as well; note that you can find a slew of event handlers as well as other information here; the dragdrop library is pretty comprehensive; you can even drop to targets; here's one of my examples )


YAHOO.util.DD is the wrapper around the object that's being dragged. So, if you need to get the object, you'll need to do this --

var dragEl = this.getDragEl();

dragEl is the node with ID "ThingToDrag". You'll also notice that we can use the node to get position information relative to the entire HTML document --

YAHOO.util.Dom.getX(dragEl);
YAHOO.util.Dom.getY(dragEl);

The x and y positions are tucked away in object literals which are pushed on an array. This is a stack of starting positions which we pop when we undo ( we'll talk more about this in the animation section ).

The handler that does most of the **work** is onDrag. It basically handles all the visual updates like --
  • The information on the position of the dragged element
  • Positions both the top and left grid markers so that they move with the element
Note that we're directly manipulating the node ( i.e. thingToDrag.style.left, etc. ). Of course, we don't have to do it this way. We could have just use YUI and the YAHOO.util.Dom.get/set methods, but we did it this way to remind us that we directly manipulate elements in the DOM ( this is in contrast to other toolkits like Bindows which totally abstracts the DOM ).

Once we've completed the drag, we can undo it. Undo starts the animation.

We'll instantiate the YAHOO.util.Motion object for the ThingToDrag node, subscribe to ( listen for ) the onTween and onComplete event handlers and then start the animation --


onTween is fired for each frame of the animation ( for each movement of ThingToDrag ) and onComplete is fired when the animation is finished ( ThingToDrag no longer moves ).

In this example the onTween handler, handleTween is the same handler as onDrag. Likewise, the onComplete handler, handleComplete is the same as endDrag.


This makes sense. There's a symmetry to undoing what you just did so it's no surprise that these event handlers are the same!

In the handler, handleComplete, we also unhook our event handlers. It's good practice to free up resources like this when they're not needed to avoid nasty memory leaks.


That's it! You can read more about the YUI dragdrop and the animation library here and here.

Feel free to study and use the example anyway you like.

Have fun!

Sunday, September 09, 2007

Yahooooooooooooooo!

Two weeks ago, I joined Yahoo!.

If you're a front-end web engineer, it's the best place to be. They have some of the best front-end engineers in the world in an environment where you can become a better cloud developer.

If you're smirking ( or laughing ), you've probably haven't noticed what Yahoo! has contributed to the world of front-end development.

A few years ago, I would have thought the same. Do you remember the *old* front page? Or, how about the pre-OddPost Yahoo! mail? Or, how about Yahoo! photo ( thank goodness for Flickr! ). Those things are legacies of Web 1.0.

Then, something happened. A couple of years ago, Yahoo! published their Design Pattern Library which catered to the user interface design and interaction folks. The Bill Scott led project really struck me as something that was useful and came at a critical time when Web 2.0 and Ajax concepts were coming into popularity.

Having a set of UI interaction patterns was only one piece of the solution. Creating a *free* library that implemented ( or at least allowed you to easily implement ) those patterns was the other. Having a library bridged the knowledge of the UI designer with the implementation skills of the front-end developer.

It demonstrated a commitment by Yahoo! to take *theoretical* concepts ( ok, some people would say "fluff" ) and introduce them to the web development community with tools to help implementation.

As an outsider, I heard Yahoo! say --

OK, here's some UI patterns that we think are really valuable and will help with usability. We've focused on interaction because that's the most important thing. UI designers will dig this stuff.

Oh and by the way, we've created a library that your web devs can easily use to supplement their code and slowly introduce these patterns into their application.

And yes, it's all free!

Then, they wanted to train all those folks to use these libraries. As a first step, Yahoo! introduced an amazing series of talks on JavaScript and the DOM by Douglas Crockford.

In fact, on YUI Theater, you'll find a complete program or "web polytechnic" for the front-end developer. You'll see talks on improving web performance, accessibility, using the YUI library, Firebug and an amazing array of web related things.

It's just amazing what they offer to cloud programmers who don't work for Yahoo!.

Since I've started, I've attended a front-end development class by CSS and JavaScript expert Natt Koechley and attended a meeting with accessibility expert Victor Tsaran.

On my immediate team, I'm working with some equally amazing people one of whom created the "Personal Assistant" ( here's my imitation. I even blogged about it. It's humbling to meet the guy that did it! ).

Last week, there was a long internal thread on sprites ( or tiling ) and whether stacked were better performing than horizontal images. Going through the responses, I realized how deep and thorough my colleagues were in their thinking and how much I still have to learn.

This is really going to be a fun ride. I've buckled my seat belt.

Yahooooooooooooooo!

Saturday, August 25, 2007

Interaction Over Visualization

Often in programming, it's best to think in orthogonal terms -- for every add, there's a remove or for every set, there's a get method, etc.

As John Resig noted in a comment on his talk on "Building a JavaScript Library" that
"if you have a method that performs one action, you should have another that performs an equal and opposite action. Secondly, that there should be one equal way to perform an action against all objects."

There's a similar concept in front-end UI ( and here, I'm focusing on my passion - the web ) which involves the symmetry of design.

There's two parts. There's the visual and then there's interaction.

Visual design is providing a consistent look and feel between pages. Visual elements should "flow" from page to page. This is why the same site maintains the same background color, font style, masthead, tabs, layout, etc. on different pages.

Achieving visual consistency is easy to do.

It's really a matter of manipulating your CSS files. Provide the necessary class names and understanding the structure of your HTML/XHTML, allows you to make good use of CSS.

CSS manipulation is also minimally intrusive. Though you'll effect the layout and look of a page, you're not forcing other team members to make substantial changes.

You're managing a set of CSS files which thankfully, is close to a standard and which is generally agreed, the best way to do things!

Sure, you'll add new class names, but you're not changing how the page is manipulated ( i.e. you're not manipulating JavaScript ) or how users interact.

Like remodeling a bathroom, you're just changing the the ceramic cream tiles to crema marfil, replacing the vanity top with a large marble slab from Spain and swapping out chrome with brushed nickel faucets. They function in the same way, but they just look different ( hopefully better! ).

Of course, when you do something like remodeling a bathroom, the look "flows out" into other areas of the house. So, the crema marfil tiles need to be visually consistent with the tiles in the hallway and perhaps even what you have in the other bathrooms. They need to match or provide visual consistency ( this is why remodeling projects typically go way over budget! ).

However, interactive consistency is more difficult to achieve. There are a number of reasons for this.

One reason is that it takes more time to story board and think through the interaction. Everyone can agree that a dashboard should have the background color #333333, but it takes a lot more thought on how to handle drag and drop transitions on a dashboard.

Fortunately, there are already interaction patterns out there. My favorite is Yahoo!'s Design Pattern Library.

Unfortunately, this doesn't mean that a workflow is easily agreed upon. Bill Scott's LiveGrid supported grid navigation not by traditional pagination but by scrolling.

It seemed to be a more "natural" way to navigate a large dataset.

Microsoft's Live.net had this feature, but eventually, it was taken out and is now only found when searching for images.

Microsoft, maybe through usability testing, felt that it wasn't necessary or good to navigate large lists using scrollbars. After all, Google doesn't do it in their search results; however, they do for their lists in the Google Reader. Even within the same company, interactions on similar things aren't always done in the same way.

Another reason is priority. Software companies, particularly those that have a lot of legacy code ( i.e. enterprise software companies ), take longer to adopt new interactions.

User interactions typically play second fiddle to functionality. If your company specializes in ETL, you're going to add functionality to allow your users to transform your data faster. You're not going to focus on how to transition fade from one dialog to the next.

Unless the interaction demonstrates "better performance" or "user efficiency" ( whatever both of those terms mean ), it usually isn't put on the worthy feature list. It's really unfortunate that there's no "Big O" notation for UI interaction.

Another consideration is technical.

Interactions involve event handling and using event driven models and unless you're using a toolkit ( i.e. YUI, Bindows, JQuery, Dojo, etc. ), manipulating events can be tedious. You typically end up writing your own libraries to abstract the events and then add additional objects/methods to handle the interaction ( i.e. DnD, animations, etc. ). It begs the question of why you didn't use a library to start with.

If you choose a library, use it. Don't choose a library and then use part of its event handling here and then use a "home grown" system ( or another libraries' ) elsewhere. Cross library event handling is difficult and really makes adding new interactions almost impossible.

Some libraries, like Bindows, is component based. This means that your widgets/components are created as JavaScript objects. Unlike YUI, you never pass in a DOM node and manipulate that. In Bindows, the DOM is totally abstracted for you. So, you have to slowly convert your code to that model. This is really the only way to add interactions to your entire application.

You can't have half your application in HTML/XHTML and the other half written in the library. If you do that, you'll reject all the interactive story boards from your user experience team.

Between the two, interactions are far more important than visualizations. Interactions deal with behavior and how your users relate to and communicate with your application. It's more valuable than a pretty face because it's the interactions that allow your users to accomplish what they need to do.

Interactions are also far more difficult to think through, design and implement. So, they should be tackled first before visualizations.

Unfortunately, often interactions are tackled last and are little afterthoughts.

Monday, July 30, 2007

Bindows Nifty Round Corners :: No Images!

In March of 2005, Alessandro Fulciniti wrote a piece on using rounded corners without the use of images -- "Nifty Corners". The idea is simple -- by stacking lines of different lengths on top of one another you form a rounded corner.

Alessandro used a combination of block elements and margins to achieve this. We can do the same by using the basic Bindows building block -- BiComponent -- manipulating its width and then using setStyleProperty() to reduce its margins.

The result is the component,
MyRoundedCorners, a BiComponent that allows you to create rounded "top" or "bottom" corner pieces --


You can use the top and the bottom piece to "sandwich" the main body of another BiComponent and create something like this Meebo-like Yahoo! login --


Because MyRoundedCorners is a BiComponent, you can listen for events and add it to other BiComponents. So, you can create a custom dialog, drag it around and even resize it as found here.

Using MyRoundedCorners is simple. To create rounded corners for the top, do this --

var topPiece = new MyRoundedCorners("top");

or with no arguments --

var topPiece = new MyRoundedCorners();

To create rounded corners for the bottom --

var bottomPiece = new MyRoundedCorners("bottom");

There are a few "public" methods ( these are the ones that are meant for you to use; of course, you could iterate through the properties and discover methods that you're not supposed to use! ) that allow you to set properties for the corners.

Most of the methods mimic the behavior found in "out of the box" Bindows components and are self explanatory --


  • setWidth(w)

  • setBackgroundColor(colorInHexOrRgb)

  • setOpacity(oValue)

This is just like BiComponent's setOpacity(). oValue should be a number between 0 and 1 where 1 is totally opaque and 0 invisible.


  • setCSSBorder(borderValue)

"borderValue" is equivalent to the values for the CSS border property like --

border: 1px solid #000;

where "borderValue" is "1px solid #000".


  • setBackgroundImage(url, repeat)
"url" is the URL value or the name of the background image that you want to use. It's the same value used in the CSS property "background-image".

"repeat" is the same as the CSS property "background-repeat". You can use values "repeat", "repeat-x", "repeat-y" or "no-repeat".

So, to create a rounded top border with a width of 400px with the background color of #9bd1fa, you'd do this --

var container = new BiComponent();
container.setSize(400, 20);
var rc = new MyRoundedCorners("top");
container.add(rc);
rc.setWidth(400);
rc.setBackgroundColor("#9bd1fa");
rc.setOpacity(1);
...
application.getWindow().add(container);

Note that the height of the rounded corners are always 5px. You can't ( and shouldn't ) change that. This makes the API even simpler because all you have to worry about is setting the width of MyRoundedCorners.

You can find the examples/test driver here. You can review the XML here and MyRoundedCorners here.

I built the component and the examples with Bindows 3.0, but it should work for other Bindows versions as well.

Have fun!

Monday, July 23, 2007

Meebo Me :: Dressing Up a Widget

In August 2006, Meebo, the web based instant messenger provider, released MeeboMe, a Flash-based chat widget which you can place on your website. MeeboMe allows your visitors to directly chat with you while they're enjoying your site.

Because it's Flash based, you can easily embed it. First, go to Meebo and create the chat widget. Then, add the Meebo generated markup. It's a simple embed tag --

<embed src="http://widget.meebo.com/mm.swf?uSvqMVsYVU" type="application/x-shockwave-flash" wmode="transparent" width="160" height="250"></embed>

You'll get something that looks like like this --


The green button at the upper right disables the widget. The main thing of course is that you can type and send messages. It does that very well.
Though it looks like a dialog, it doesn't behave like one. You can't close the MeeboMe widget and you can't move it around.

So, let's make it a dialog!

The first thing that we'll do is add a close button ( I got the icon from Everaldo.com via IconDB ). Then, we'll make the dialog draggable.

To do both, we have to think in terms of layers or containers. The general idea is to put the embedded Flash widget inside a containing div. Then, add the close button on top of the widget. Being on top, our close button covers the green button. The close button has a higher z-index. Here's the code snippet --

<div id="MeeboWidget" class="MeeboTalker">
<
embed src="http://widget.meebo.com/mm.swf?uSvqMVsYVU" type="application/x-shockwave-flash" wmode="transparent" width="160" height="250"></embed>
<div class="CloseButton"></div>
</div>

Next, we'll listen for the events at the container level ( id is "MeeboMeWidget" ). This allows us to handle events only at one rather than multiple levels. Note that we're not event delegating -- we're only listening for a click and a mousedown event ( this is used to initiate drag ).


Here's the new MeeboMe dialog --


You can view the code by coming here and then view the source.

Have fun!

Wednesday, July 11, 2007

At the Movies with Jaman

As part of front end development, I sign up for a lot of beta testing. It helps me to see what's the state of the art and what everyone else is doing.

Once in a while, I'm lucky enough to get into private betas. Jaman was one. I've been through the private beta and now, I'm a regular user ( by the way, for all you movie lovers, if you sign up now, you'll get 3 free downloads. If you sign up via this special promotional link, you'll get 4 free downloads. What a deal! ).

I'm really fond of dark, particularly black backgrounds because it provides ample contrast. It's the constrast and not so much color that make things standout.


Jaman's focus is on world cinema. They create virtual film festivals that focus on films that you won't ever see in mainstream theaters.

Super blogger and techman, Robert Scoble did a video interview with Jaman founder, Gaurav Dhillion here. It's worth a watch to get an idea of what they're doing. Om Malik also had a nice piece on them as well.

Jaman has a lot of your art films, but they're also major motion pictures from foreign countries ( for example, you can watch the superb multi-award winning Indian film Black ).

They're also documentaries ( see classic American cars in today's Cuba -- Yank Tanks ), shorts ( watch the 3 minute satire - The American Infant ) and my favorite -- animations ( check out Fumi and the Bad Luck Foot for a smile, a laugh and maybe even a giggle ).

After you watch the movies, you can share your thoughts with other movie lovers as well.

The beauty of the web is that the world is made much smaller. We all can enjoy the wonders of film from great film makers all over the world.

You can enjoy Jaman too.

Hope you are having a fun summer and watch some movies!

Sunday, July 01, 2007

IE Memory Leaks

Mark Wubben blogged that Microsoft recently released a security patch that among other things fixed memory leaks in IE 6.0 on XP. Specifically, Microsoft mentions a fix for --

"A memory leak occurs in Internet Explorer 6 when you view a Web page that uses JScript scripting on a Windows XP-based computer"

More details are found here.

It's important to note that the fix is only for IE 6.0 running in XP. It doesn't address IE 6.0 running in W2K or IE 5.5. It's also a patch that's applied to the entire OS with a number of other fixes. So, some people ( ex. corporations ) may be hesitant to install it until they've fully verified that the patch is more beneficial than hurtful.

Of course, if you're using IE 7, none of this matters because memory leaks don't occur there anymore.

With these elements in play, I'd thought we'd review memory management in IE.

Memory leaks occur in IE because of circular references between DOM elements and JavaScript objects ( it's really JScript objects -- Microsoft's implementation of JavaScript ).

Circular references aren't a problem with other browsers just IE. This is because IE uses two different memory managers -- one for DOM elements ( DOM elements are represented as COM objects and so use the COM garbage collector ) and one for JavaScript objects which uses a different one.

Since the two memory managers don't communicate with one another they don't know that there are "islands" of circular references which are no longer used. The memory managers get confused and then bad things happen.

Note that I've simplified this a lot. If you want the gory details read Joel Webber's dated but really good description of the issue.

In IE, when memory leaks happen, they don't go away when you navigate to a new page. Instead, the memory loss carries over. If you use a process/memory viewer like Process Explorer, you'll observe this.

The only way to free the memory ( other than breaking the circular references ) is to close and restart the browser.

Circular references between DOM and JavaScript objects are common. If you've ever attached an event to a DOM element and have your event handler refer back to the element, you've created a circular reference. They can also occur when you create closures ( inner functions can access variables outside of itself even after the enclosing function has returned ), but the more common occurrence is the first one.

Fortunately, it's easy to break the circular reference and as it turns out, it's easier to break the link from the DOM rather than from the JavaScript side of things.

For events, you do it differently depending on how you've attached the events.

DOM Level 0 Events
All browsers support Level 0 event handling. This is probably the first type of event handling that you learned when learning about HTML and JavaScript events. Level 0 event handling allows you to attach events directly to the HTML element like this --

<div id="SomeDiv" onclick="handleClick();"></div>

The div element has a reference to the JavaScript object handleClick via the onclick attribute. If the method handleClick has a reference back to the div ( for example "this" ), then a circular reference occurs.

It's not optimal to review every event handler to see if a circular reference exists. It's better to just unhook the event handler when you no longer need it.

So, follow this maxim of symmetry - if you add it, remove it.


For DOM Level 0 events, removing it is pretty easy. You nullify it --

<script type="text/javascript">
var someDiv = document.getElementById("SomeDiv");

someDiv.onclick = null; // Set the handler to null

</script>

DOM Level 2 Events
DOM Level 2 event handling supports a number of methods such as addEventListener and removeEventListener. The equivalent methods in IE are attachEvent and detachEvent respectively. We follow the same symmetry with Level 2 events. We add events like this ( with the IE methods ) --

obj.attachEvent( 'onclick', handleClick );

then, we do this to remove them --

obj.detachEvent('onclick', handleClick);

A generic way to do this is to use a Singleton object that abstracts how to add or remove events so you don't have to worry about the browser you're using --


It's best to cleanup the events when you "unload" from a page. Listen for the unload event and when that occurs, have your event handler remove the event handlers.

Here's a DOM Level 0 example and here's a DOM Level 2 example for you to try.

I hope that this is something you can use in your own code.

Have fun!

Friday, June 15, 2007

Bindows 3.0 :: 3 Animations in a Dashboard

Early this month, Bindows 3.0 was released.

One of it's main features is the animation library. I'd written about it before.

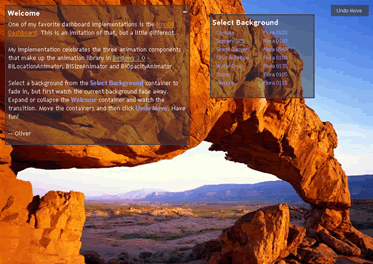
To celebrate 3.0's release, I've put the animation library to good use by using their three animators - BiSizeAnimator, BiOpacityAnimator, and BiLocationAnimator - and created this dashboard.


It's an imitation of the cool looking IconDB Dashboard ( IconDB never had animated "transitions"; so, I've added these in various places of my example ).

Here's some functionality from the example.

Observe change in opacity by selecting a background from the Select Background container. Watch the background fade out and then watch the new one fade in.

Click on the expand button in the Welcome container and watch as the container transitions to an expanded container. Then, collapse and watch it shrink.

Drag one of the containers. Then, drag the other. Do this as many times as you'd like and then click on Undo Move. Watch as containers move back to their previous positions.

There's a lot in this example, but rather than talk about the design of the dashboard or how it's constructed ( I'll blog about that in a later entry ), for now, I'll focus on the animation library.

The
animation tutorials on the Bindows site are excellent, but they focus on the declarative ( XML ) piece. With the dashboard example, we'll see how to use it with the JavaScript API. This will supplement the tutorials.

One of the nice things about the animators is that they're separate from the components. They animate BiComponents. So, if you've built a custom component from an earlier version of Bindows, you don't need to change your component to use the animator. You just simply switch to Bindows 3.0, construct an animator by passing in the component and then start the animation.

General Pattern
In general, the constructor for the three animators follow this pattern --

BiAnimator([parameters for the type of animation], nSpeed, bLoop, nAccType, oComp, nFrameRate, bAutoStart)

Each animation type -- Size, Opacity and Location -- requires specific parameters to be passed and so, they differ depending on the type of animation that we want to do.

nSpeed is how fast you want your animation to occur in milliseconds. You can set it directly as a number or a constant ( i.e. BiSizeAnimator.SPEED1, BiOpacityAnimator.SPEED1, BiLocationAnimator.SPEED1, etc. Note that the speed constants differ depending on the type of animation ). You can even use strings - "slowest", "slow", "normal", "fast" and "fastest."

You can repeatedly do the animation by passing bLoop as true. In the dashboard example, all the animators have this set to false.

You can set acceleration, nAccType, for your animation. Typically, the animation is run at "constant speed" meaning that throughout the entire animation cycle, the animation is done in the same speed. You can accelerate, decelerate or "go slow then fast then slow" by using these constants - BiComponentAnimation.SLOW_TO_FAST, BiComponentAnimation.FAST_TO_SLOW, BiComponentAnimation.SLOW_TO_SLOW. Constant speed is BiComponentAnimation.CONSTANT_SPEED.

oComp is simply the component that the animator acts upon. Only BiComponents can be animated.

nFrameRate is the number of frames per second for the animation. We'll use the default -- BiFpsGenerator.DEFAULT_FRAME_RATE. Just pass in a natural number. We can play with this setting to get a "smooth" animation. In the dashboard example, using the default frame rate results in a smooth animation.

bAutoStart allows you to auto start the animation. We typically set this as false because we want to control when we want to start the animation.

It's Event Driven
So far, we've looked at what properties we can set on an animator. Though this is useful, it doesn't tell us how to interact with the animator. An animation is useless if you can't control it.

Starting an animation is easy -

  1. Construct an BiComponent
  2. Construct an animator ( by passing in the parameters to the constructor as described above )
  3. Call the start() method

The animation starts and then ends., but how do we know when it ends?

We'll listen for the "animationend" event. When that occurs, we can perform our next set of operations in the event handler. In the next section, we'll see in the dashboard example how we do this.

Note that during the animation, the animators constantly fire the "frameprogression" event. If we want, we can check for that, but in our example, we don't do that.

Opacity
The dashboard's background opacity is controlled by the BiOpacityAnimator. Setting opacity allows you to fade components. Components can gradually fade in or fade out.

The fade out occurs when we select a background image ( ex. Olympia, etc. ). The current background fades out and once that animation ends, the fade in of the Olympia background begins.


Notice how the fadeOut animator listens for the "animationend" event. When that event is fired, the handleAnimationEnd method is invoked, which does three things --

  • Starts the fade in animation
  • Disposes the fade out animator

When the fade in completes, we dispose the fade out animator.

It's important to remember that the "animationend" event drives everything. We'll see this pattern in the other animations as well.

Change Size
You can change the size of the container by controlling the BiSizeAnimator. In the Welcome container, click on the collapse button at the upper right. You'll see that the container acts like a drawer closing. Click on the expand button and the animation goes the other way.


There's not much difference between this example and the opacity one. The opacity animator does have an extra last boolean parameter, bForward, which allows the animation to progress forward or in reverse ( fade out ).

Changing the Location
Changing the location of the container is done by using BiLocationAnimator. Move the containers around the dashboard. Then, click on Undo Move. The container moves back to their previous position.


You can review the opacity and the location animators here. The size animator is found here.

The example is here.

Have fun!