Showing posts with label dashboard. Show all posts

Sunday, April 06, 2008

Persistent iGoogle Dashboards :: Redux

From time to time, I get questions about the iGoogle imitation example. The most often asked question is how to persist the layout once you've moved the containers. One way to do it is to use cookies. Because the original example used the YUI library to handle drag and drop and because YUI 2.5.1 now supports a beta cookie library, we'll take the cookie approach.

Keep in mind that this is very simple example. Our containers don't contain data and we don't have a backend ( i.e. PHP, JSP, etc. ). We're just going to persist layout and that's pretty easy to do with cookies.


Here's the
example.

The general idea is that if the layout cookie isn't set, we'll show the default positions ( the default layout is already there; we've just set the display to "none" ). Otherwise, we'll layout based on what's found in the cookie.

What does the cookie look like?

Well, all of our containers ( "Container 1", "Container 2", etc. ) have static positions and are found in three columns. So, we'll use three subcookies ( c1, c2 and c3 ) where each subcookie contains a string consisting of element IDs. The cookie's name is "igoogimi" and expires every 14 days. If we were to look at the cookie on April 6, 2008, we'd see something like --


Name :: igoogimi

Value :: c1=Rec1%2CRec2&c2=Rec3%2CRec4%2CAbout&c3=Rec5%2CRec6
Expires :: Sun, 20 Apr 2008 05:41:55 GMT

Setting and getting a subcookie is pretty straightforward and it's
well documented. Setting our subcookie is interesting because we use the method YAHOO.util.Dom.getChildrenBy to query the DOM looking for the column IDs. Here's our setCookies method --
        var setCookies = function() {
// BEGIN :: Calculate cookie expiration to 14 days from today
var date = new Date();
date.setTime(date.getTime()+(14*24*60*60*1000));
// END :: Calculate cookie expiration to 14 days from today
var getNode = function(node) {
return (node.id==="Rec1"||node.id==="Rec2"||node.id==="Rec3"||node.id==="Rec4"||node.id==="Rec5"||node.id==="Rec6"||node.id==="About");
}
var createString = function(colId) {
var nodes = YAHOO.util.Dom.getChildrenBy(document.getElementById(colId), getNode);
var list = [];
var l = nodes.length;
for(var i=0;i<l;i++) {
list[i] = nodes[i].id;
}
return list.toString();
}
YAHOO.util.Cookie.setSub("igoogimi", "c1", createString("Column1"), {expires: date});
YAHOO.util.Cookie.setSub("igoogimi", "c2", createString("Column2"), {expires: date});
YAHOO.util.Cookie.setSub("igoogimi", "c3", createString("Column3"), {expires: date});
}

Notice that the method
createString creates the subcookies values by looking for all children of the node with the matching column ID which pass the boolean test defined as the getNode method. In this method, we check to see if any of the children have IDs equal to the containers. If so, then those children ( these are nodes ) are returned. From those children, a string consisting of IDs in the order of their appearance in the DOM is created.

We set the igoogimi cookie when the unload event is fired. This occurs when we navigate to another page, close the browser, etc. This ensures that the cookie is always set.


When we read the cookie, a number of things happen.


The entire page is hidden through CSS ( the body's display is set to "none" ). We do this because the default layout is always there. We don't want it to appear and then be replaced by the layout found in the cookie.


Once we've determined whether the cookie exists, we remove all the nodes while keeping a reference to them. Then, we'll add them back based on the order that they're found in the igoogimi cookie --

          var containerRef = [];
var node;

// BEGIN :: Removing the nodes
var cArray1 = c1.split(",");
var len = cArray1.length;
for(var i=0;i<len;i++){
node = document.getElementById(cArray1[i]);
node?containerRef[cArray1[i]] = node.parentNode.removeChild(node):"";
}
var cArray2 = c2.split(",");
len = cArray2.length;
for(var i=0;i<len;i++){
node = document.getElementById(cArray2[i]);
node?containerRef[cArray2[i]] = node.parentNode.removeChild(node):"";
}
var cArray3 = c3.split(",");
len = cArray3.length;
for(var i=0;i<len;i++){
node = document.getElementById(cArray3[i]);
node?containerRef[cArray3[i]] = node.parentNode.removeChild(node):"";
}
// END :: Removing the nodes

// BEGIN :: Adding the nodes
len = cArray1.length;
var col = document.getElementById("Column1");
var tmpCR;
for(var i=0;i<len;i++){
tmpCR = containerRef[cArray1[i]];
tmpCR?col.appendChild(tmpCR):"";
}
len = cArray2.length;
var col = document.getElementById("Column2");
for(var i=0;i<len;i++){
tmpCR = containerRef[cArray2[i]];
tmpCR?col.appendChild(tmpCR):"";
}
len = cArray3.length;
var col = document.getElementById("Column3");
for(var i=0;i<len;i++){
tmpCR = containerRef[cArray3[i]];
tmpCR?col.appendChild(tmpCR):"";
}
// END :: Adding the nodes

Keep in mind that we're passing through the DOM twice -- once for removal and another for insertion. So, it's not terribly efficient. Note that the removal and the insertions dynamically update the DOM and if we didn't hide the body, then the page would be jumping all over the place ( this is known as reflow where DOM manipulations are done when rendering is completed ). Once the last node has been added, we set the body's display to "block" and all the containers appear.


You can see our
example here. To review the code, simply view the source.

Feel free to use and make it better.

Have fun!
Sunday, November 18, 2007

iGoogle and Newsvine Dashboards

I've always been partial to dashboards and often write about it. I've done a number of prototypes just to experiment with visualizations.

Dashboards allow you to organize and see the information you want without adding too much clutter.

Here's my implementation. It works in IE, Firefox, Safari and Opera.

I particular like the visualizations found in the iGoogle and Newsvine dashboards. They provide nice feedback on the container that you're moving and where you'll drop it. So, I've copied that.

When you move a container, everything is **real** size -- not a sliver for where you'll drop the container. For me, the argument that you cause too drastic of a visual change to the layout doesn't hold water.

You're only moving one container at a time and it's not a common operation. You basically move a container, get it into the fold and view it.

You're also only dealing with a **few** containers. This is a dashboard.

The key to the implementation is controlling the container's drag over behavior. Each container needs to react to the container that's being dragged over it. So, pick a library that the supports such behavior ( you can pick Bindows, but keep in mind that if you do, you won't be able to see the dashboard if you turn JavaScript off; of course, with any library, turning it off means that there's no behavior at all! ).

My implementation uses YUI 2.3 which easily handles drag over with the drag and drop library.

In this case, a drag over, inserts a temporary marker above the container.

When you drag out, the marker is removed and the container list collapses ( each container is statically positioned ).

All of the JavaScript is really short and pretty much self explanatory. Run the example and view the source. Use and improve it.

Have fun!

Friday, June 15, 2007

Bindows 3.0 :: 3 Animations in a Dashboard

Early this month, Bindows 3.0 was released.

One of it's main features is the animation library. I'd written about it before.

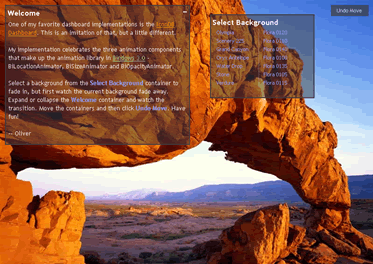
To celebrate 3.0's release, I've put the animation library to good use by using their three animators - BiSizeAnimator, BiOpacityAnimator, and BiLocationAnimator - and created this dashboard.


It's an imitation of the cool looking IconDB Dashboard ( IconDB never had animated "transitions"; so, I've added these in various places of my example ).

Here's some functionality from the example.

Observe change in opacity by selecting a background from the Select Background container. Watch the background fade out and then watch the new one fade in.

Click on the expand button in the Welcome container and watch as the container transitions to an expanded container. Then, collapse and watch it shrink.

Drag one of the containers. Then, drag the other. Do this as many times as you'd like and then click on Undo Move. Watch as containers move back to their previous positions.

There's a lot in this example, but rather than talk about the design of the dashboard or how it's constructed ( I'll blog about that in a later entry ), for now, I'll focus on the animation library.

The
animation tutorials on the Bindows site are excellent, but they focus on the declarative ( XML ) piece. With the dashboard example, we'll see how to use it with the JavaScript API. This will supplement the tutorials.

One of the nice things about the animators is that they're separate from the components. They animate BiComponents. So, if you've built a custom component from an earlier version of Bindows, you don't need to change your component to use the animator. You just simply switch to Bindows 3.0, construct an animator by passing in the component and then start the animation.

General Pattern
In general, the constructor for the three animators follow this pattern --

BiAnimator([parameters for the type of animation], nSpeed, bLoop, nAccType, oComp, nFrameRate, bAutoStart)

Each animation type -- Size, Opacity and Location -- requires specific parameters to be passed and so, they differ depending on the type of animation that we want to do.

nSpeed is how fast you want your animation to occur in milliseconds. You can set it directly as a number or a constant ( i.e. BiSizeAnimator.SPEED1, BiOpacityAnimator.SPEED1, BiLocationAnimator.SPEED1, etc. Note that the speed constants differ depending on the type of animation ). You can even use strings - "slowest", "slow", "normal", "fast" and "fastest."

You can repeatedly do the animation by passing bLoop as true. In the dashboard example, all the animators have this set to false.

You can set acceleration, nAccType, for your animation. Typically, the animation is run at "constant speed" meaning that throughout the entire animation cycle, the animation is done in the same speed. You can accelerate, decelerate or "go slow then fast then slow" by using these constants - BiComponentAnimation.SLOW_TO_FAST, BiComponentAnimation.FAST_TO_SLOW, BiComponentAnimation.SLOW_TO_SLOW. Constant speed is BiComponentAnimation.CONSTANT_SPEED.

oComp is simply the component that the animator acts upon. Only BiComponents can be animated.

nFrameRate is the number of frames per second for the animation. We'll use the default -- BiFpsGenerator.DEFAULT_FRAME_RATE. Just pass in a natural number. We can play with this setting to get a "smooth" animation. In the dashboard example, using the default frame rate results in a smooth animation.

bAutoStart allows you to auto start the animation. We typically set this as false because we want to control when we want to start the animation.

It's Event Driven
So far, we've looked at what properties we can set on an animator. Though this is useful, it doesn't tell us how to interact with the animator. An animation is useless if you can't control it.

Starting an animation is easy -

  1. Construct an BiComponent
  2. Construct an animator ( by passing in the parameters to the constructor as described above )
  3. Call the start() method

The animation starts and then ends., but how do we know when it ends?

We'll listen for the "animationend" event. When that occurs, we can perform our next set of operations in the event handler. In the next section, we'll see in the dashboard example how we do this.

Note that during the animation, the animators constantly fire the "frameprogression" event. If we want, we can check for that, but in our example, we don't do that.

Opacity
The dashboard's background opacity is controlled by the BiOpacityAnimator. Setting opacity allows you to fade components. Components can gradually fade in or fade out.

The fade out occurs when we select a background image ( ex. Olympia, etc. ). The current background fades out and once that animation ends, the fade in of the Olympia background begins.


Notice how the fadeOut animator listens for the "animationend" event. When that event is fired, the handleAnimationEnd method is invoked, which does three things --

  • Starts the fade in animation
  • Disposes the fade out animator

When the fade in completes, we dispose the fade out animator.

It's important to remember that the "animationend" event drives everything. We'll see this pattern in the other animations as well.

Change Size
You can change the size of the container by controlling the BiSizeAnimator. In the Welcome container, click on the collapse button at the upper right. You'll see that the container acts like a drawer closing. Click on the expand button and the animation goes the other way.


There's not much difference between this example and the opacity one. The opacity animator does have an extra last boolean parameter, bForward, which allows the animation to progress forward or in reverse ( fade out ).

Changing the Location
Changing the location of the container is done by using BiLocationAnimator. Move the containers around the dashboard. Then, click on Undo Move. The container moves back to their previous position.


You can review the opacity and the location animators here. The size animator is found here.

The example is here.

Have fun!